Do you always use the same thank you stamp or the same birthday stamp? Do you know how many sentiments you own? Well, now you can make a sentiment ring to keep your cards fresh. You will be surprised at how many sentiments are in your stamp sets. Simply stamp your sentiments onto a neutral cardstock and label the back with the name of the set. String all the "thank you", "birthday", "friend", etc onto one ring. You'll be amazed at how many sentiments you own! Below is my Friend Sentiment Ring. I made a few of these to swap at convention. Enjoy!

Sunday, July 17, 2011


Saturday, July 16, 2011
Fancy Fold Swap

- Aviary
- Wicked Cool
- Jet Black Stazon
- Classic Tangerine Tango
- Lucky Limeade
- Whisper White
- Concord Crush
- Concord Crush 1/2" Stitched Poly Ribbon
- Lucky Limeade and Tangerine Tango markers
- Spider Web Textured Impressions Embossing Folder
- Circle punch from the Itty Bitty Punch Pack
- Dimensionals
- Stay-put-Bow
- Fancy Fold Template
 Directions for cutting and scoring: Base card is 4 1/4 x 11". Cut vertical slits 3/4" or 1" wide from both long edges, starting 1" from the bottom to 6 1/2". Now there are 2 edge panels and a center panel. Score and fold at 1", 2", and 6 1/2" from the bottom, but only along the 2 edge panels. Score and fold at 5 1/2" from the bottom only on the center panel.
Friday, July 15, 2011
Word Play Swap #2
My 2nd card for the Word Play swap at convention is a holiday card. The coloring is off a little, but this card was super easy to create. I love using the white stazon on window sheets. It rarely smears and dries quickly. I punched the window sheet and Garden Green cardstock with the ornament punch. The red glimmer paper is attached to the back of the window sheet with a mini glue dot and it doesn't show. Behind the red glimmer paper is a dimensional. Enjoy!
![]()
Stamp Set:


Stamp Set:
- Word Play
- Real Red,
- Naturals White
- Garden Green
- Ornament Punch
- Window Sheet
- Dimensionals
- Brights Collection Paper Stack DSP
- Real Red 1/8" Taffeta Ribbon
- Mini Glue Dots
- White Stazon
- Red Glimmer Paper
Thursday, July 14, 2011
Word Play Swap No. 1
While at convention, I participated in a Word Play swap. This is the first card I designed for the swap. Loving the Big Shot. I used it for the butterflies and used an embossing folder (which doesn't show real well in the photo.)
![]()

Set:
- Word Play
Classic Ink:
- Wild Wasabi
Cardstock:
- Wild Wasabi
- Whisper White
- Pretty in Pink
Accessories:
- Pretty in Pink 5/8" Satin Ribbon
- Elegant Bouquet Textured Impressions Embossing Folder
- Perfect Polka Dots Textured Impressions Embossing Folder
- Beautiful Butterflies Bigz Die
- Jewels
- Circle Punch from the Itty Bitty Shapes Punch Pack
- Sticky Strip
- Beyond the Garden DSP
Tips:
- Butterflies are attached with sticky strip
- I punched a small circle (under the ribbon knot) and did a stay-put-knot.
Wednesday, July 13, 2011
Tags Til Christmas Swap 2011

Stamps
- Tags Til Christmas
- Whisper White
- Wisteria Wonder or Pretty in Pink
- Melon Mambo
Classic Ink
- Wisteria Wonder
Accessories
- Multipurpose Adhesive Sheets
- Northern Frost Sizzlit
- Jewels
- 1 3/4" Circle Punch
- 2 3/8" Scallop Circle Punch
- 5/8" White Organza Ribbon, dyed with Wisteria Wonder Classic Ink Refill
- Flitatious Specialty Designer Paper

Tammy
Tuesday, July 12, 2011
Wow Swap 2011 Teacup Card

Stamp Sets:
- Elizabeth
- Timeless Treasures
- Crumb Cake
- Early Espresso
Cardstock:
- Whisper White
- Pretty in Pink
Accessories:
- 5/8" Satin Ribbon in Pretty in Pink
- Basic Pearls
- Brayer
- Champagne Mist Shimmer Paint
- Sponges
- Big Shot Multipurpose Adhesive Sheets
- Vintage Wallpaper Textured Impressions Embossing Folder
- Dimensionals
- Big Shot

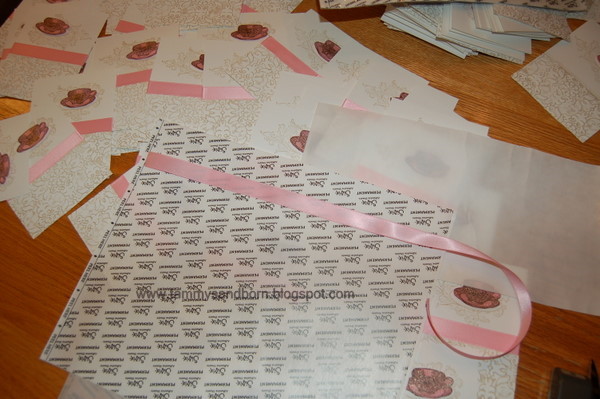
Peel ribbon and place at the edge of the embossed cardstock. Adhese to cardfront to card. Apply pearls.


Thursday, January 28, 2010
Build-A-Bear Laundry Line

Just wanted to share a cute laundry line. The clothes are from the Beary Best Friends stamp set. The background paper is of course from the Sweet Pea Designer paper.
Tuesday, January 19, 2010
Wishing for warmer weather!

It has warmed up a tad and the snowfall from December 18th is melted all away, finally. This cute card features the sunflowers from A Flower for All Seasons ( a set you can get for free during Sale-A-Bration). My friend and fellow stamper, Kim S, designed and colored this card. I love how she used sponge daubers to color the image. Rich Razzleberry and Crushed Curry make for a bright and cheery note in the midst of winter. Enjoy!
Sunday, January 17, 2010
Sweet Pea Inspiration

The color inspiration for this card comes from the Sweet Pea designer paper stack. I used a tone on tone for the Teeny Tiny Wishes greeting, (it's a little hard to see in this picture.) Punched a 1 3/8" circle from the taken with teal layer to create the frame focal point. Enjoy!
Friday, January 15, 2010
Love Bandit #1

Love Bandit is very cute. Stamped with a good friend, Kim, and she came up with this cute card. It uses Going Gray, Basic Gray, Pretty in Pink and Pink Passion cardstocks. Added some texture with the Polka Dot SU! folder.
Subscribe to:
Posts (Atom)
